
Best Backpacking in Canada: 19 Scenic Trips & Multi-Day Hikes
Best Backpacking in Canada: As one of the world’s most popular hiking destinations, it’s no surprise that Canada is home to some amazing multi-day hikes.
In fact, Canada is one of the best places in the world to go backpacking, thanks to the diverse and rugged wilderness which covers most of the country. But with so many amazing hikes to choose from, it can be difficult to decide where to start. Therefore, I’ve put together my list of the top backpacking trips in Canada, to help you choose your next adventure.
How do I know these are the best? I’m an avid hiker who’s lived in Canada since 2018 and spent years exploring its trails from coast to coast. Every summer, I make the most of the country’s incredible scenery by tackling new hiking and backpacking routes — including many of the top multi-day trails featured in this guide, with even more planned for the upcoming season.
Chasing Chanelle contains affiliate links and is a member of the Amazon Services LLC Associates Program. If you make a purchase using one of these links, we may receive compensation at no extra cost to you. We only recommend products and services we use and trust. Read our disclaimer for more information.
Backpacking in Canada: Best Scenic Trips & Multi-Day Hikes
Canada has everything from dramatic mountain ranges, thick forests and picturesque valleys, to rugged coastlines, extensive grasslands and the most lakes in the world. Therefore, you can expect to find great hiking trails across the country.
However, if you’re looking to go backpacking in Canada, you will need to know where to go. Although there are tons of amazing multi-day hikes, they all vary in length, terrain and difficulty, and offer completely different backcountry experiences.
Plus, most trails only allow camping at designated campsites, which usually require reservations. Therefore it’s important to plan ahead.
So, to help you find your next backpacking adventure, here are the 19 best and most scenic multi-day hikes in Canada!
1. Mt. Assiniboine Provincial Park, BC
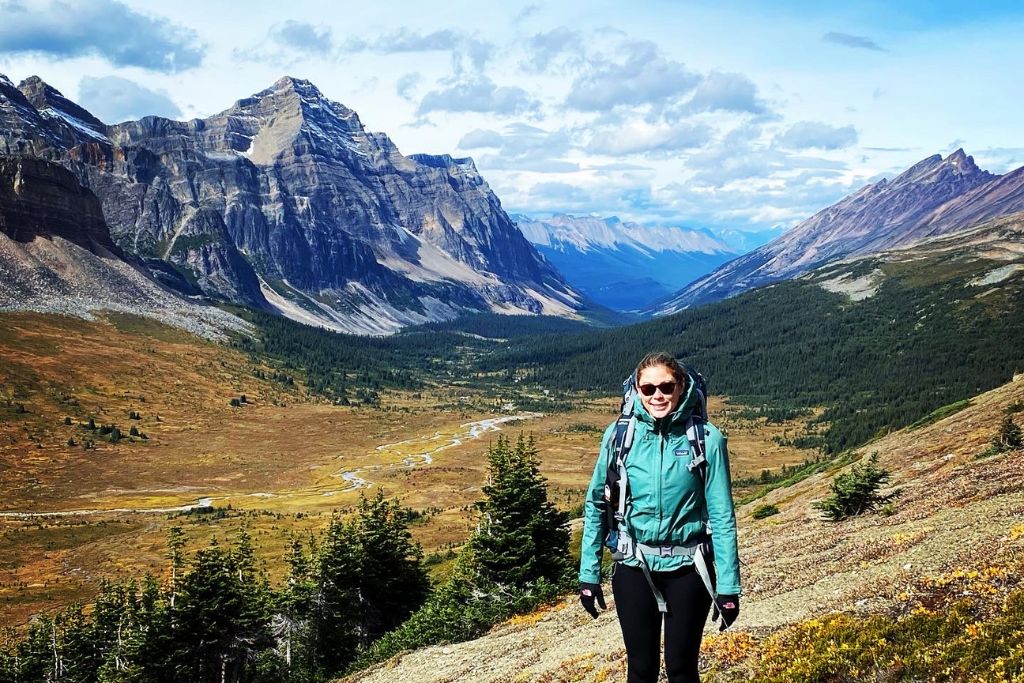
The most spectacular view I have ever seen in Canada was on a fall hike in Mt. Assiniboine Provincial Park. And not only does Mt. Assiniboine have some of the most beautiful scenery in all of Canada, it’s also relatively untouched. The park is not that easy to get to, which means it’s protected from crowds and retains its remote beauty.
There are actually two ways to get to Mt. Assiniboine. One option is to fly in by helicopter (which costs $265 + tax each way). The other is to hike in, which is what we chose to do. Your destination inside the park is Magog Lake, where there is a campground, and North America’s first backcountry ski lodge, Assiniboine Lodge.
There are several routes to hike in, starting from either Sunshine Village or the Mount Shark trailhead. You can either do a loop, out and back, or end to end hike. The trails range from 26 to 30 kilometres (16.1 to 18.6 miles) with between 400 to 580 meters (1312 to 1903 feet) of elevation gain. There are campsites along the way, so its typical to take 2 days to hike in and out.
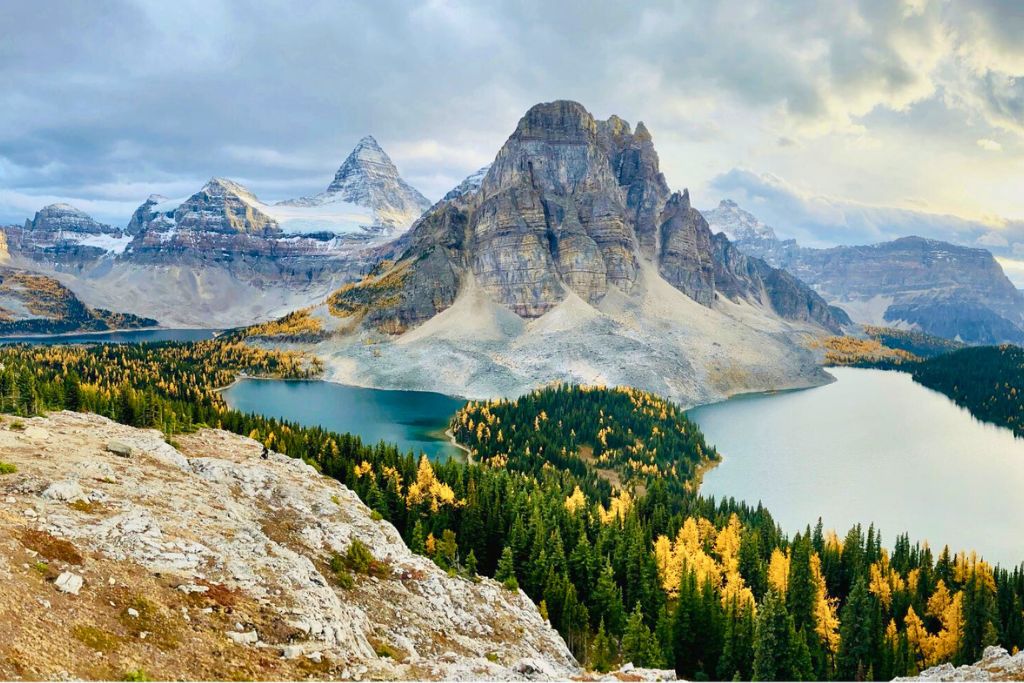
Once you arrive at Magog Lake, you can base yourself there while you explore the park. I recommend spending at least 2 nights there to make the most of the various backcountry trails and stunning landscape. In particular, it’s worth doing the short hike up to the Niblet and Nublet for the absolute best views!
It’s important to plan your trip to Assiniboine Provincial Park well in advance, as reservations for the lodge and campground book up very quickly. But the planning and journey in is absolutely worth it!
Mt. Assiniboine Quick Facts
Distance: 26 to 30 kilometres (16.1 to 18.6 miles) + additional trails
Type of Hike: Loop, out and back, or end-to-end
Elevation Gain: 400 to 580 meters (1,312 to 1,903 feet) + additional trails
Hike Time: 1-2 days each way + time inside the park
Difficulty: Moderate
Location: Mt. Assiniboine Provincial Park, BC
Trailheads: Sunshine Village & Mount Shark
Reservations/Passes: Camping or Lodge reservations required; pass required to park at Sunshine Village (National Parks Pass) and Mount Shark (Kananaskis Conservation Pass)
Trail Information: Lake Magog via Assiniboine Pass and Wonder Pass; Sunshine Village to Assiniboine Lodge
Where to Stay Nearby
📍Sunshine Mountain Lodge – This lodge is the perfect place to stay if you’re ending your hike in Sunshine Village, with onsite restaurants, an outdoor pool and hot tub and spa services for you to relax and recharge.
📍Mount Engadine Lodge – Located near the Mount Shark trailhead, this is a convenient and peaceful lodge to stay at to start or end your hike.
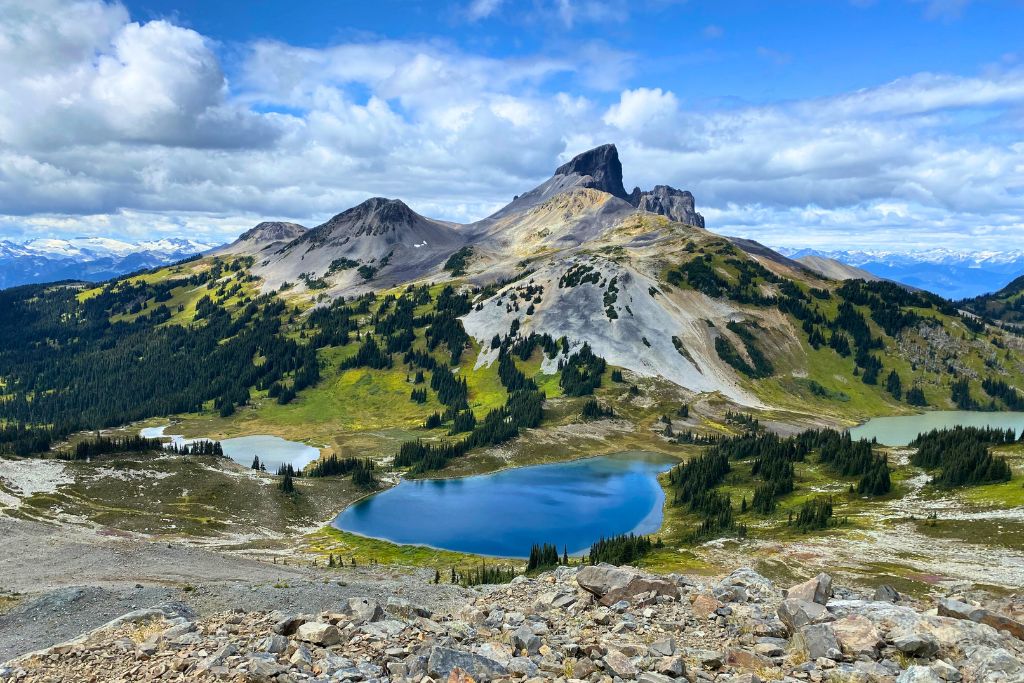
2. Garibaldi Lake, BC
Another backpacking trip which will see you hiking in and basing yourself from the campsite to explore the area is Garibaldi Lake near Whistler, where you will see some of the most famous views in Canada!
This is an out-and-back trail which is 9 kilometres (each way) to the lake campground. This trail mostly consists of switchbacks through the forest, so there aren’t many views on the way up. Plus it’s quite a workout as you will gain 820 meters (2,690 feet) of elevation, which is a lot with a heavy pack!
But, the elevation gain is steady, the forest is very enchanting, and once you get to the campground you will be rewarded with a campsite on the shores of stunning Garibaldi Lake, and the opportunity to explore this beautiful provincial park.
Once your camp is set up, the true adventure begins!
Doing the day hikes from Garibaldi Lake really is the highlight of this backpacking trip. For the most spectacular panoramic views of the turquoise-blue lake, you can do a 13.4 kilometre (8.3 mile) out-and-back hike to Panorama Ride.
And to stand on top of the region’s most iconic landmark, there’s a 10.3 kilometre (6.4 mile) trail to the top of the Black Tusk. The hikes to Panorama Ride and Black Tusk follow the same trail for the first few kilometres, so if you’re up for a challenge you can actually do both on the same day. Although, be warned, there is quite a lot of elevation gain, so you do need to be relatively fit to hike these.
When we backpacked in Garibaldi, we hiked to the lake campground on the first day. Then, on the second day we actually tackled both Black Tusk and Panorama Ridge, and hiked all the way back out again. This was a long 30+ kilometre day, but it was definitely worth it!
Note – If you aren’t able to get a reservation for the Garibaldi Lake campground, there is another campground a few kms away at Taylor Meadows. Alternatively, you can also do a (long) day hike to Garibaldi Lake and/or Panorama Ridge or Black Tusk.
Garibaldi Lake Quick Facts
Distance: 18 kilometres (11.2 miles) + additional trails
Type of Hike: out and back
Elevation Gain: 820 meters (2,690 feet) + additional trails
Hike Time: 2 days + time inside the park
Difficulty: Moderate (to the campground; additional trails are more difficult)
Location: Garibaldi Provincial Park, BC
Trailhead: Rubble Creek
Reservations/Passes: Camping reservations required
Trail Information: Garibaldi Lake from Rubble Creek
Where to Stay Nearby
📍Pan Pacific Whistler Village Centre – Stay right in the heart of Whistler with all the bars, restaurants and shops right on your doorstep. Plus there’s an onsite spa to relax after your backpacking trip!
📍Tantalus Resort Lodge – This traditional lodge-style resort offers self-contained 2-bedroom suites ideal to accommodate the whole family, and plenty of onsite facilities including a swimming pool, hot tub, sauna, tennis courts, and volleyball.
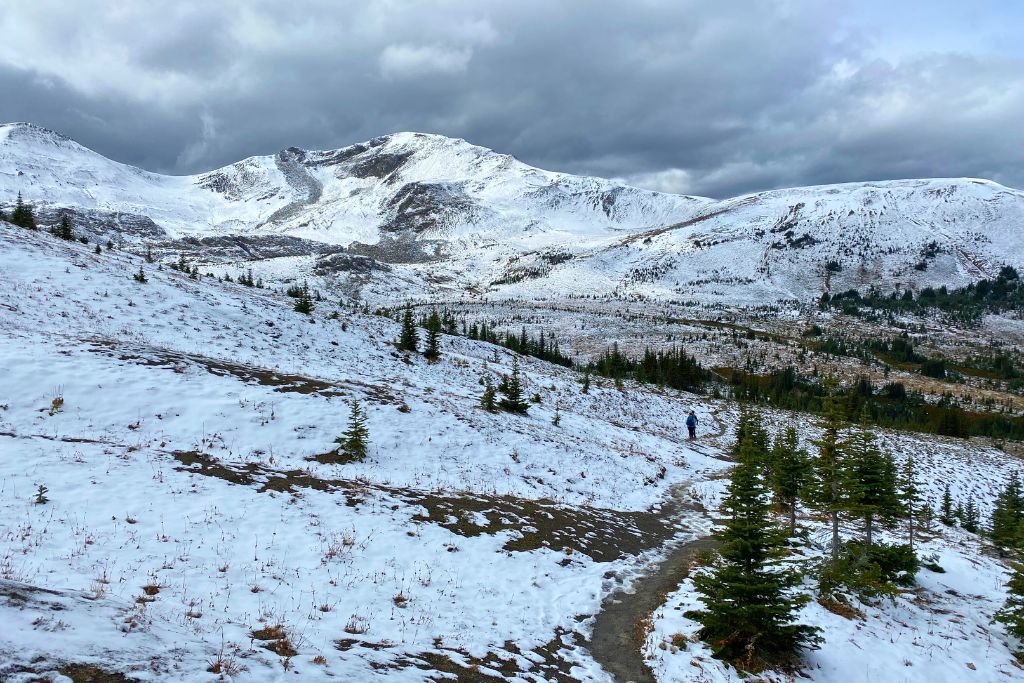
3. Skyline Trail, Alberta
The Skyline Trail is one of the most popular backpacking trips in Canada, and for a good reason. Almost two-thirds of this 44-kilometre (27.3 mile) trail is above the tree line, meaning you get hours and hours of epic unrestricted views!
You can expect to see a bit of everything on this hike, including dramatic mountain peaks, colourful alpine meadows, huge valleys, wind-swept ridges, and pristine glacial lakes.
There are several campsites along the trail and most people will complete the hike in 2-3 days, taking their time to enjoy the breathtaking views. However, you will sometimes encounter trail runners on the trail, challenging themselves to complete the whole thing in just one day!
The terrain on the Skyline Trail isn’t particularly technical, but you can be faced with some challenges. Some of the sections lower down, which pass through meadows, can get very muddy. Plus, there is quite a lot of elevation gain. Although it is gradual and gentle, this can be challenging when carrying a heavy pack.
And, given that so much of the hike is above the tree line, the trail can be particularly affected by the weather, and even impassable due to snow early and late in the season.
Unfortunately this was the case when we did the trail, resulting in us having to turn around half way. Although the half that we did get to see on this hike was stunning and it’s on my radar to try it again soon!
Skyline Trail Quick Facts
Distance: 44 kilometres (27.3 miles)
Type of Hike: end-to-end
Elevation Gain: 1,410 meters (4,626 feet)
Hike Time: 2-3 days
Difficulty: Moderate-difficult
Location: Jasper National Park, Alberta
Trailheads: Maligne Lake & Signal Mountain
Reservations/Passes: Camping reservations and National Parks Pass required
Trail Information: Skyline Trail
Where to Stay Nearby
📍Mount Robson Inn – This is the ideal hotel for a comfortable stay before or after your hike, with exceptionally clean and modern rooms, and breakfast included.
📍Athabasca Hotel, Jasper – This is a beautiful historic hotel full of old-world charm offering a comfortable but budget-friendly stay.
4. Chilkoot Trail, BC, Yukon and Alaska
The Chilkoot Trail is the ideal backpacking trip for those seeking a true journey.
Not only does the trail make its way through various landscapes and two countries, but it’s also a journey through time and history.
Originally a major access route to the Yukon goldfields in the 1890s, you will see remnants of the gold rush along the way. You will get to walk the same path as the Chilkoot Tlingit traders did centuries ago, before the trail was stormed by 100,000 prospectors who made their way to the Yukon during the Klondike Gold Rush.
Starting in Dyea, Skagway in Alaska, the trail takes you through coastal temperate rainforest, historic mining towns, and high into the alpine across the Canadian border. The trail finishes in the abandoned townsite of Bennett City in BC. Once you arrive at Bennett City, there is a train service which can take you back to Skagway, but make sure to book your ticket in advance!
Throughout the hike you can expect to see breathtaking views, pristine lakes, wild rivers and snow-covered mountain passes.

There are multiple campgrounds along the way and most backpackers will complete the journey in 3-5 days. Campsites are on a first come first served basis on the US side, but reservations are required for the Canadian side. You also must have a trail permit to hike this trail, which is bookable through Parks Canada.
Chilkoot Trail Quick Facts
Distance: 53 kilometres (33 miles)
Type of Hike: end-to-end
Elevation Gain: 1,070 meters (3,510 feet)
Hike Time: 3-5 days
Difficulty: Moderate-difficult
Location: Chilkoot Trail National Historic Site, BC & Yukon (Canada), and Klondike Gold Rush National Historical Park, Alaska (US)
Trailhead: Chilkoot Trailhead, Dyea
Reservations/Passes: Camping reservations and Trail Permit required
Trail Information: Chilkoot Trail Pass
Where to Stay Nearby
📍Historic Skagway Inn – Stay at this historic inn with cozy rooms and a fantastic home cooked breakfast close to the trailhead before starting your hike.
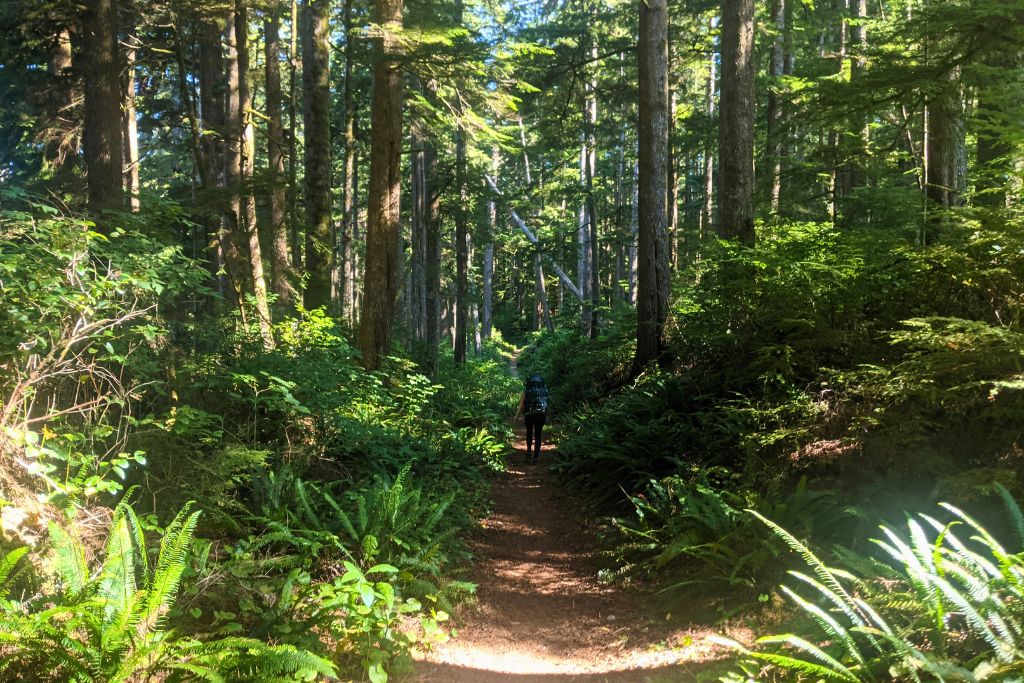
5. West Coast Trail, BC
One of the most famous backpacking trails in the world, the West Coast Trail in Pacific Rim National Park is truly a bucket list-worthy hike.
Located on Vancouver Island‘s southwest coast, this unique hike spans 75 kilometres (46.6 miles) of interesting terrain through enchanting old-growth rainforest and remote beaches along the Pacific Ocean.
You will encounter all sorts of obstacles and challenges along the way, including huge boulder fields, changing tides, and tons of mud to navigate, as well as several manual cable cars, plenty of slippery boardwalks and bridges, and over 70 ladders to climb!
Plus, on top of the crazy terrain you’ll cover, there are beautiful and rugged coastal views throughout the hike, plenty of marine and wildlife to spot, and beach camping every night.

Backpacking the West Coast Trail is no small feat. Firstly, you need to navigate the somewhat hectic and tricky reservation process – as spots on the trail are in high demand the peak dates sell out almost instantly!
Then, you have to prepare yourself for the hike. This means planning and gathering gear to handle all kinds of weather, ensuring you’re physically prepared for both the hiking and climbing up all the ladders, and organizing all the other logistics of the hike such as getting to and from the trailhead and learning to read tide tables.
But don’t let this scare you, as it is all worth it in the end. The West Coast Trail truly is one of the most memorable and enjoyable experiences you will ever have. And, to reassure you, I actually did it as my first ever backpacking trip (although this is not recommended)!
West Coast Trail Quick Facts
Distance: 75 kilometres (46.6 miles)
Type of Hike: end-to-end
Elevation Gain: around 1,800 meters (5,905 feet) total up and down
Hike Time: 6-7 days (maximum 14 days)
Difficulty: Difficult
Location: Pacific Rim National Park, Vancouver Island, BC
Trailheads: Pachena Bay (northern), Gordon River (southern) & Nitinaht Village (mid-way point)
Reservations/Passes: Trail permit and National Parks Pass required (+ additional fees at time of booking)
Trail Information: West Coast Trail Guide
Where to Stay Nearby
📍The Hiker Huts, Port Renfrew – If you want to stay near the Sourthern trailhead before you start your hike, book a night in one of the convenient hiker huts!
📍Abigail’s Hotel, Victoria – If you want to spend some time exploring Victoria after your hike, step back in time and enjoy the hospitality (and gourmet breakfast) at this beautiful and historic Victorian hotel.
6. Juan de Fuca Marine Trail, BC
If you haven’t been able to get reservations for Canada’s iconic West Coast Trail, luckily there is another amazing hike just next door. Vancouver Island’s neighbouring Juan de Fuca Marine Trail offers many of the same experiences as the West Coast Trail, across a shorter 47 kilometre (29.2 mile) distance.
However, don’t let this fool you into thinking it’s any easier than the West Coast Trail. In fact, a lot of people consider it to be much harder!
The Juan de Fuca has less infrastructure along the way, meaning that in sections where you would have found bridges or ladders on the West Coast Trail, you will have to make your way through deep mud or scramble up cliffs with the help of ropes. Although these extra challenges can be a lot of fun, they may slow you down quite a lot. But rest assured, there are also easy sections on this trail too!
Another key difference between the Juan de Fuca and the West Coast Trail is that the Juan de Fuca is mostly a forest trail. Although it does have some beach sections, most of your hiking will be in the trees, meaning you won’t get as many views as you do on some other coastal hikes.
But, despite this, it’s still a beautiful hike and, in my opinion, it’s one of the best coastal hikes in Canada.
Plus, it’s one of the few backpacking trails in Canada that you don’t have to reserve! Instead, the campsites operate on a first come first served basis and all you need to do in advance is register your hike with BC Parks.
Juan de Fuca Marine Trail Quick Facts
Distance: 47 kilometres (29.2 miles)
Type of Hike: end-to-end
Elevation Gain: around 1,400 meters (4,593 feet) total up and down
Hike Time: 3-5 days
Difficulty: Difficult
Location: Juan de Fuca Park, Vancouver Island, BC
Trailheads: China Beach (eastern) & Botanical Beach (western)
Reservations/Passes: No reservations, but backcountry registration required for $10/night
Trail Information: Juan de Fuca Trail
Where to Stay Nearby
📍Prior Castle Inn, Victoria – Unwind by immersing yourself in charm and luxury at this historic Edwardian-era hotel in Victoria.
📍Raven Point Inn, Ladysmith – If you’re travelling to and from Vancouver Island via Nanaimo, spend a night at this charming inn in nearby Ladysmith.
7. The Rockwall, BC
The Rockwall trail is another must-do hike on every backpacking in Canada bucket-list.
This 56 kilometre (34.8 mile) trail takes you through three breathtaking alpine passes and past bright-turquoise lakes, cascading waterfalls, wildflower-filled meadows, hanging glaciers and dramatic mountain peaks.
But the highlight of this trail is the impressive limestone cliffs, known as the ‘rockwall’, after which the hike is named. These towering cliffs stretch for 30 kilometres creating a massive wall along which the trail runs.
Given the high mountain passes, The Rockwall trail is usually only passable from mid-July to early-October, due to snow. And, as long as the snow doesn’t arrive too early, mid-late September is one of the best times to hike the trail, as it’s full of larch trees which turn bright gold during the fall.

The short backpacking window on the Rockwall Trail can make getting a reservation quite challenging. So make sure you plan your trip well in advance and are ready to book as soon as reservations open early in the year.
Most backpackers will complete this trail in 4 to 5 days, to take the time to enjoy the spectacular scenery. But, as reservations can be difficult to get, this may somewhat dictate your itinerary. As such, it’s not uncommon for hikers to complete the trip in 3 days (or sometimes even less)!
The Rockwall Quick Facts
Distance: 56 kilometres (34.8 miles) round trip
Type of Hike: out-and-back
Elevation Gain: 2,885 meters (9,465 feet)
Hike Time: 3-5 days
Difficulty: Difficult
Location: Kootenay National Park, BC
Trailheads: Paint Pots (northern), Floe Lake (southern) & Numa Falls (mid-way point)
Reservations/Passes: Camping reservations and National Parks Pass required
Trail Information: The Rockwall
Where to Stay Nearby
📍Bighorn Meadows Resort – This is the perfect resort to unwind after your hike with beautiful grounds, plenty of facilities, and proximity to the Radium Hot Springs pools.
8. Brazeau Loop, Alberta
Another backpacking trip with truly epic views is the Brazeau Loop.
Located near the Columbia Icefield in Alberta, this hike isn’t quite as well known as some of the others on the list. But I can say with full confidence that it is one of the best trails for backpacking in Canada!
This breathtaking loop takes you through 82 kilometres (51 miles) of rugged and wild backcountry wilderness in Jasper National Park. Be warned, it does have some difficult sections with quite a lot of elevation gain, but it is absolutely worth the effort.
And, even though the trail can book out during the peak season, it’s so remote that you can easily hike a whole day without running into anyone else.
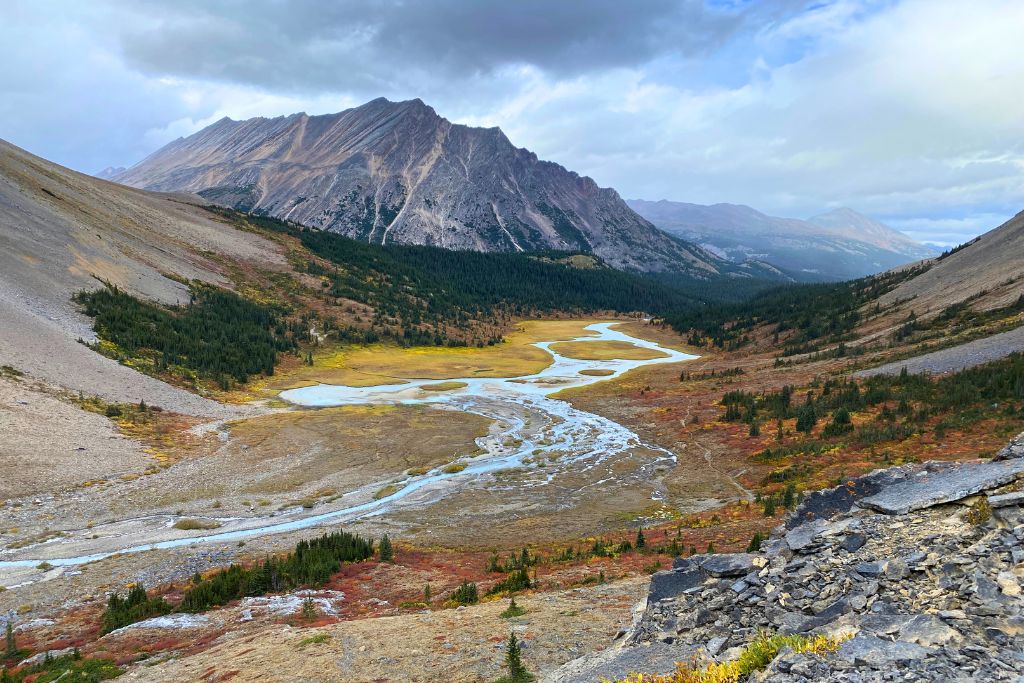
Similar to The Rockwall trail, this hike takes you over three high mountain passes, for some of the most dramatic views of any hike on this list. Plus, you will pass through colourful wildflower-filled meadows, spend a night camping by the pristine Brazeau Lake, and marvel at huge alpine valleys as far as the eye can see.
Given the remoteness of the Brazeau Loop, it’s also rich in wildlife. When we hiked it we spotted two grizzly bears and a bull moose (although we kept a safe distance)!
Brazeau Loop Quick Facts
Distance: 82 kilometres (51 miles)
Type of Hike: loop
Elevation Gain: 2,582 meters (8,471 feet)
Hike Time: 4-5 days
Difficulty: Difficult
Location: Jasper National Park, Alberta
Trailhead: Nigel Creek Trailhead
Reservations/Passes: Camping reservations and National Parks Pass required
Trail Information: Brazeau Loop
Where to Stay Nearby
📍Sunwapta Falls Rocky Mountain Lodge – For a cozy mountain lodge with an onsite bar and restaurant, located close to the trailhead.
📍Glacier View Lodge – Explore the Columbia Icefield and relax with views of the Athabasca Glacier after your hike.
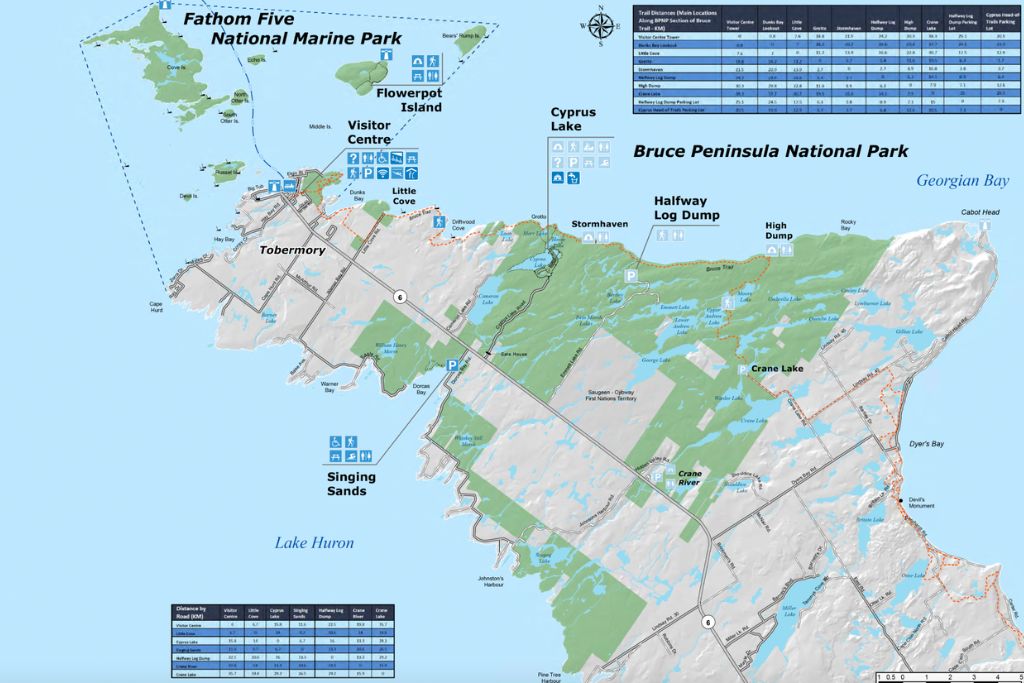
9. Bruce Peninsula, Ontario
You probably didn’t expect Canada to have beaches with crystal-clear turquoise-blue waters like the Caribbean. But on Ontario’s northern Bruce Peninsula National Park you will find just that!
The backpacking trail on the Bruce Peninsula is part of the 890 kilometre (553 mile) Bruce Trail, which is Canada’s oldest and longest officially marked hiking trail. Although don’t worry, backpacking the Bruce Peninsula section won’t see you hiking quite this far.
There are only two backcountry campsites in Bruce Peninsula National Park: High Dump and Stormhaven. So most people will usually spend 1-2 nights in the park. But there are several hiking trails which you can do to these campsites, or connect multiple trails to do a longer trip. So you can really tailor your hike to suit your itinerary and what you want to see.
It’s possible to do a point-to-point backpacking trip in the park.
To combine both campsites into one longer backpacking trip, you can start on the southern end of the trail, inland at the Crane Lake trailhead. You will then hike 8 kilometres to the High Dump campground for your first night. The next day, make your way north for 9 kilometres to the Stormhaven campground for the second night.
The third day will be a long day, but luckily at this point your pack will be at its lightest. You will hike 21 kilometres all the way to the northern trailhead at Little Cove Beach near the picturesque town of Tobermory.
On this hike you will pass by some of the peninsula’s most stunning scenery, including the Grotto: an intricate natural sea cave filled with clear blue water that you can stop to explore. Although the water here is COLD, it’s beautiful to look at and refreshing for a quick dip after a long day of hiking.

The trail on the Bruce Peninsula isn’t overly difficult, as it’s relatively flat, with small sections of up and down. But it does have a lot of rocks, roots and even some boulders you will need to climb up and down, making it a bit more difficult in sections.
However, the biggest challenge you will face is the logistics of doing an end-to-end hike, as there isn’t any public transport nearby. Therefore, you would need to organize transport to the trailhead in advance, or hike in a group with two cars and leave one at each end. Alternatively, you can plan an out-and-back route inside the park.
Bruce Peninsula Quick Facts
Distance: 38 kilometres (23.6 miles) end-to-end (or tailor your own shorter or longer route)
Type of Hike: end-to-end (or out-and-back)
Elevation Gain: around 800 meters (2,625 feet) total up and down
Hike Time: 2-3 days
Difficulty: Easy-moderate
Location: Bruce Peninsula National Park, Ontario
Trailheads: Crane Lake (southern), Little Cove beach (northern), and Halfway Log Dump & Cyprus Lake (mid-way trailheads)
Reservations/Passes: Camping reservations and National Parks Pass required
Trail Information: Crane Lake to High Dump; High Dump to Halfway Log Dump; Halfway Log Dump to the Grotto; and The Grotto to Little Cove
Where to Stay Nearby
📍Stone Cove Waterfront B&B – stay in Tobermory before or after your hike and relax at this highly rated adults only luxury B&B.
10. Fundy Footpath, New Brunswick
On Canada’s east coast there are also some amazing backpacking routes. And one of the most spectacular ones is the Fundy Footpath in New Brunswick.
What’s special about this hike is that the trail stretches along the beautiful Bay of Fundy, which is famous for having the world’s highest tides!
On the way, you will face difficult terrain including rocks, roots and steep up and down sections. In fact, every day you will hike up and down several times, often along slippery and narrow trails, which can be technically and physically challenging.
But the challenge is worth it, with spectacular views from the top of 100-meter high cliffs, rugged coastline, brick-red coloured rocks, Acadian old-growth forest and beautiful beachfront campsites.

The campsites along the way are primitive, but a lot of them feel very remote, which adds to the adventure. And, you don’t need to reserve them, which means you can take the hike at your own pace and tailor it as you go along.
Some sections of the Fundy Footpath also attracts day hikers. But not that many people backpack the trail, so it’s mostly very quiet. Therefore, you’re not likely to encounter many other people which is another reason why the Fundy Footpath is one of the best backpacking trips in Canada!
Fundy Footpath Quick Facts
Distance: 64 kilometres (39.8 miles)
Type of Hike: end-to-end
Elevation Gain: 1,929 meters (6,329 feet)
Hike Time: 4-5 days
Difficulty: Difficult
Location: Fundy National Park, New Brunswick
Trailheads: Goose River trailhead or Fundy National Park Visitor Centre (eastern), and Big Salmon River Suspension Bridge (western)
Reservations/Passes: No reservations but trail registration is required
Trail Information: Fundy Footpath (Note – AllTrails shows a shorter route)
Where to Stay Nearby
📍Beach Street Inn – Stay close to the Salmon River trailhead at this beautiful beachfront inn in St. Martins after your hike.
11. East Coast Trail, Newfoundland and Labrador
Another scenic coastal hike in eastern Canada is the famous East Coast Trail in Newfoundland and Labrador. In fact, it follows the Avalon Peninsula on North America’s eastern most coastline. So you can’t get any more east coast than this!
This trail is made up of 25 different paths which add up to a total of 336 kilometres (209 miles)! It’s definitely feasible to hike the whole trail, but you will probably need 3 to 4 weeks to do so. Therefore, most people choose to backpack just certain sections over several days.
What makes this trail so special is how it combines the best of wilderness hiking with historic communities. You will make your way along a mix of wild trails and maintained walking paths, connecting various charming towns and key landmarks along the shores of the Atlantic Ocean. These include historic sites, abandoned coastal villages, archaeological dig sites, and a 50-meter high suspension bridge.
And the views on this backpacking adventure are stunning, as you will pass by plenty of geographical wonders. You can expect to see rock arches, sea stacks, towering cliffs, fjords, and even a sea-driven freshwater geyser, known as ‘the spout’. Plus, there’s a chance you will spot icebergs floating past, as well as a range of marine and wildlife.

There are six established (but primitive) campsites on the trail. However they are a little far and few between so camping alongside the trail is permitted (although you should seek permission if the land is on private property).
If you prefer to hike in more comfort, you can instead stay in B&Bs and guesthouses along the way. Organizing this can be a little logistically challenging. But having a comfortable bed and a hot home cooked meal every night can make it worth it!
East Coast Trail Quick Facts
Distance: 336 kilometres (209 miles) total (most people hike shorter sections)
Type of Hike: end-to-end
Elevation Gain: 11,987 meters (39,327 feet) total up and down
Hike Time: 3-4 weeks (shorter sections usually hiked in 3-7 days)
Difficulty: Moderate-difficult
Location: Avalon Peninsula, Newfoundland and Labrador
Trailheads: Topsail Beach (northern) & Cappahayden (southern) + many access points in-between
Reservations/Passes: Not needed
Trail Information: Trans Canada Trail – East Coast Trail
Where to Stay Nearby
📍B&Bs and Guesthouses – If you want to stay in B&Bs and Guesthouses along the trail, one option is to book a package through Great Canadian Trails.
12. Berg Lake Trail, BC
The Berg Lake Trail in Mount Robson Provincial Park is one of Canada’s most popular backpacking trails. This is largely due to the views of the huge Berg Glacier cascading into the brilliant-blue Berg Lake, which is the highlight of Mount Robson Provincial Park.
And although this truly is a spectacular sight to see, this is just one of many reasons why the Berg Lake Trail is one of the best destinations for backpacking in Canada.
It has a little bit of everything, with towering peaks, colourful valleys, powerful waterfalls, impressive glaciers and pristine lakeside campsites. And you get almost constant views of Mount Robson, which is the tallest mountain in the Canadian Rockies!

It is a 21 kilometre (13 mile) out-and-back hike to the Berg Lake Campsite. Although there are other campsites along the way, so you can break up the hike in and out into multiple days.
Once you get to Berg Lake, this is a great place to base yourself for a couple of days while you explore the park. There are several beautiful day hikes you can do in the park. In particular, hiking up to Snowbird Pass, although a challenging hike, is especially rewarding as you will get some of the best glacier views in Canada.
Reservations for the Berg Lake Trail have always been challenging to get, especially now that the trail has reopened following several years of closures. So, if the trail is of interest to you, make sure you plan well in advance and book your spot as soon as reservations open.
Berg Lake Trail Quick Facts
Distance: 42 kilometres (26 miles) round trip
Type of Hike: out-and-back
Elevation Gain: 800 meters (2,625 feet)
Hike Time: 2-4 days
Difficulty: Moderate
Location: Mount Robson Provincial Park, BC
Trailhead: Berg Lake Trailhead
Reservations/Passes: Camping reservations required
Trail Information: Berg Lake Trail
Where to Stay Nearby
📍Twin Peaks Resort – For rustic but comfortable cabin-style accommodation with excellent views near the trailhead.
13. Skoki Loop, Alberta
For an easy backpacking trip without compromising on views, the Skoki Loop hike near Lake Louise is ideal. This is a great hike to do if you’re new to backpacking, or don’t have too much time but still want to explore Banff’s backcountry.
Typically this 37 kilometre (23 mile) hike is done over 3 days. But it’s also easily fit into 2 days if you’re short on time, or 4 days if you want to take your time to admire the spectacular views.
While the trail isn’t particularly difficult, you will encounter a nice variety of terrain to keep things interesting. This includes everything from flat valleys and forested trail, to steep climbs, scrambles and loose rock.
But the best part are the views! You will come across several pristine mountain lakes, gushing waterfalls, colourful alpine meadows, towering peaks and an abundance of wildlife.

There are four backcountry campsites on the loop, which are all beautiful spots to spend the night. For an evenly split three day itinerary you will want to stay at the Baker Lake Campground on night one, followed by the Merlin Meadows campground on night two.
Skoki Loop Quick Facts
Distance: 37 kilometres (23 miles)
Type of Hike: loop
Elevation Gain: 1,330 meters (4,364 feet)
Hike Time: 2-4 days
Difficulty: Moderate
Location: Banff National Park, Alberta
Trailhead: Fish Creek trailhead
Reservations/Passes: Camping reservations and National Parks Pass required
Trail Information: Skoki Loop Backpacking Trail
Where to Stay Nearby
📍Fairmont Château Lake Louise – For a truly memorable experience, spend a night at the iconic Fairmont Château on the shores of Lake Louise!
14. Joffre Lakes, BC
Another easy overnight trip, which is ideal for first time backpackers, is beautiful Joffre Lakes Provincial Park. This park is famous for its three pristine turquoise lakes and is a very popular day hiking destination, just an hour north of Whistler.
In fact, it’s one of the most Instagram famous spots in Canada and is so popular that it’s overrun with day hikers in the summer. But, one way to get around this and enjoy the park without the crowds is to camp overnight.
The campsite is located right at the end of the trail, above the third lake (Upper Joffre Lake), and most day hikers won’t come this far. In fact, many of them stop at the second lake, so the third lake is much quieter even during peak times. And little do they know, they’re missing out on some of the best views in the whole park!
At the third lake, you can see the Matier Glacier (which feeds the Lakes) closer up. And you can walk up above the campsite for spectacular views of the Upper Lake and the surrounding mountain range.

This is a great beginner backpacking trip!
Given the short distance of this hike (4.7 kilometres / 2.9 miles each way), it’s a great way to try backpacking as a first-timer, as you won’t have to carry the heavy pack for too long.
The trail is also relatively easy, as it’s well-maintained, but there is a bit of elevation gain which can slow you down, and there are some obstacles like roots and rocks in sections to be cautious of. The biggest technical challenge is the very end of the trail when you have to hike across a field of boulders and rocks to get to the campground. But just go slow and be careful with your footing!
It should only take you 2-3 hours to reach the campground, so you can even start this backpacking trip later in the day.
We actually did Joffre Lakes as a stop on a road trip, and started our hike at 6pm, once most of the crowds had left for the day. But I would only recommend doing this if you’re an experienced backpacker and are prepared to hike in the dark, in case you don’t make it to camp before sunset.
Joffre Lakes Quick Facts
Distance: 9.4 kilometres (5.8 miles) round trip
Type of Hike: out-and-back
Elevation Gain: 400 meters (1,312 feet)
Hike Time: 2 days
Difficulty: Easy-moderate
Location: Joffre Lakes Provincial Park, BC
Trailhead: Joffre Lakes parking lot
Reservations/Passes: Camping reservations required
Trail Information: Joffre Lakes Hike
Where to Stay Nearby
📍SweetWater Lane Farm – After your hike enjoy a nearby farm stay in a private cabin, surrounded by nature and animals, with a jacuzzi and sauna.
📍Pan Pacific Whistler Village Centre – Spend a couple of nights in the heart of Whistler before or after your trip, with an onsite spa to relax at!
15. La Cloche Silhouette Trail, Ontario
Considered the Crown Jewel of Ontario parks, Killarney Provincial Park is home to the province’s most famous backpacking route, the La Cloche Silhouette Trail.
This 78 kilometre trail takes you on a multi-day loop around the park, challenging you both technically and physically. It’s recommended to hike this trail over 7 to 10 days, although more experienced backpackers will sometimes do it in 5 or 6 days.
The reason it takes so long to complete the distance is the rugged and technical terrain which involves constant steep ascents and descents, boulders, rocks, roots and mud.

But it’s not just the challenge of accomplishing this hike which attracts backpackers every year. It’s an opportunity to immerse yourself in the best of Ontario’s rugged wilderness, with hiking along quartzite ridges, through dense forest, and by crystal-clear lakes. Plus, you will get stunning views of the La Cloche mountain range, and can enjoy private lakeside campsites every night.
La Cloche Silhouette Trail Quick Facts
Distance: 78 kilometres (48.5 miles)
Type of Hike: loop
Elevation Gain: 2,357 meters (7,733 feet)
Hike Time: 7-10 days
Difficulty: Difficult
Location: Killarney Provincial Park, Ontario
Trailhead: George Lake Campground
Reservations/Passes: Camping reservations (and vehicle permit) required
Trail Information: La Cloche Silhouette Trail
Where to Stay Nearby
📍Killarney Mountain Lodge – Stay near the trailhead to relax and enjoy more of the beautiful natural surroundings at this full-service luxury rustic resort.
16. Long Range Traverse, Newfoundland and Labrador
If you’re looking to truly get off the beaten path and test your backpacking skills, the Long Range Traverse in Newfoundland is the hike for you. This is one of Canada’s most difficult and remote hiking trails. But you’ll be blown away by the truly epic views!
The trip starts by taking a boat shuttle down the Western Brook Pond – a landlocked fjord carved out by glaciers and now home to foliage covered cliffs, cascading waterfalls and plenty of wildlife. It’s hard to imagine a better way to start a backpacking trip!
Once the boat drops you off at the start point, you will have 3-4 days of hiking and camping your way through Gros Morne National Park’s most wild and beautiful terrain.
But the thing that makes this hike such a memorable backpacking trip is the fact that there is no official trail, and the majority of the route is unmarked. This means you have to use a map and compass to find your way, for a true backcountry experience. Plus, the park only allows up to 12 people to start the hike per day, meaning you’ll have most of the trail to yourself.

Although the trail is roughly 36 kilometres (22.4 miles) long, based on your navigation skills and how much you choose to explore, you can easily cover far more distance than this.
Although an epic backcountry adventure, this hike really isn’t for the faint hearted. You will need to be an experienced backpacker, know how to navigate using a compass and be prepared for all types of challenges and discomfort. But it will all be worth it!
Long Range Traverse Quick Facts
Distance: 36 kilometres (22.4 miles)
Type of Hike: end-to-end
Elevation Gain: 1,593 meters (5,226 feet)
Hike Time: 4-5 days
Difficulty: Difficult
Location: Gros Morne National Park, Newfoundland and Labrador
Trailheads: Western Brook Pond (start – access via boat shuttle) & Highway 430 via Gros Morne Mountain Trail (end)
Reservations/Passes: National Parks Pass and Long Range Traverse reservations required (including reservation fee, wilderness hiking fee, boat shuttle and backcountry map)
Trail Information: Long Range Traverse – Parks Canada
Where to Stay Nearby
📍Ocean View Hotel – Relax with ocean views and indulge in a fresh lobster dinner after your hike at this Rocky Harbour hotel and restaurant.
17. La Traversée De Charlevoix, Quebec
In addition to its charming European-style towns and delicious food, Canada’s French province, Quebec, also has some excellent hiking and backpacking. And one of it’s best trails is the multi-day Traversée de Charlevoix.
This extensive hike seamlessly connects the Grands-Jardins National Park to Mont Grand-Fonds via Charlevoix’s remote hinterland. Taking you on a journey through the region’s enchanting semi-boreal forest, you will encounter diverse ecosystems, varied terrain, and panoramic views of the surrounding summits and valleys below.
Typically completed in 5 to 7 days, you will cross 105 kilometres (65 miles) of well-maintained trails. Although, depending on the time of year, you may encounter a lot of mud, or even snow early in the season.

In addition to the beautiful terrain and views, another reason why this is such a great trail for backpacking in Canada is that is open all year! In the shoulder seasons you can snow shoe the trail. And in winter, it’s open for ski touring. Although you do need to be an experienced backcountry skier to do this.
And if you prefer not to camp, there are cabins and cottages along the trail which you can rent, which is a particularly great option for winter trips.
La Traversée De Charlevoix Quick Facts
Distance: 105 kilometres (65 miles)
Type of Hike: end-to-end
Elevation Gain: 2,674 meters (8,773 feet) total up and down
Hike Time: 5-7 days
Difficulty: Moderate-difficult (depending on the conditions)
Location: Charlevoix Region, Quebec
Trailheads: Park Welcome Centre (start) & Mont Grand-Fonds (end)
Reservations/Passes: Camping or cabin/cottage reservations and Quebec Parks Pass required.
Trail Information: La Traversée de Charlevoix (Note – AllTrails shows a shorter route)
Where to Stay Nearby
📍Auberge Fleurs de Lune – Spend a night at a charming inn in the Charlevoix region with views of the St. Lawrence River following your hike.
18. Tonquin Valley, Alberta
The Tonquin Valley is another amazing alpine destination for backpacking in Canada.
Located in Jasper National Park, you will come across picturesque meadows, scenic lakes, dramatic glaciers and impressive mountain peaks. Plus, the trail is known for having a lot of wildlife, including black bears, grizzly bears and caribou.
The trail is 43 kilometres (26.7 miles) which is generally hiked over three days. However, there are several side trails in the park, so some people choose to spend more nights camping, to do these extra trails.

Another great thing about the Tonquin Valley is that it’s a relatively easy hike, with less elevation gain than many other backpacking trips in the Rockies. And, while it can book out during peak season, this trail generally isn’t as popular as some of the other hikes on this list. Therefore, it can be easier to get a reservation.
However, there are some downsides: the Tonquin Valley is known for being very buggy and muddy. The mud can be hard to avoid, especially in the marshy sections of the trail. But you can minimize the bugs by hiking the trail at the end of summer or in the fall.
Tonquin Valley Quick Facts
Distance: 43 kilometres (26.7 miles)
Type of Hike: end-to-end
Elevation Gain: 966 meters (3,169 feet) total up and down
Hike Time: 3 days (+ extra days for side trips)
Difficulty: Easy-moderate
Location: Jasper National Park, Alberta
Trailheads: Astoria & Portal
Reservations/Passes: Camping reservations and National Parks Pass required
Trail Information: Tonquin Valley Trail via Astoria Trailhead
Where to Stay Nearby
📍Athabasca Hotel, Jasper – This beautiful historic hotel offers a comfortable but budget-friendly stay in Jasper, amidst old-world charm.
📍Mount Robson Inn – This is one of the most highly rated hotels in Jasper, with comfortable, clean and modern rooms, and breakfast included!
19. Lake Superior Coastal Trail, Ontario
The final hike to make the list is another coastal trail, this time on the shore of Lake Superior, the largest of the great lakes.
Not only will this hike give you the opportunity to experience the power of Lake Superior, but you will also traverse lush forests, hike up rocky headlands and relax on pristine beaches with spectacular views of the rugged coastline.
And, the daytime views aren’t the only sights worth seeing on the trail. Lake Superior Provincial Park is one of the darkest certified Dark Sky Preserves in Ontario, meaning it’s a stargazer’s paradise.

The 65 kilometre (40.4 mile) trail can be backed in its entirety over 5-6 days, or broken down into smaller sections.
Hiking only a section of the trail is actually quite common, given there are lots of access points along the way, and it’s actually a very challenging trail. There are plenty of steep climbs, large boulders and slippery rocks, which can be difficult to navigate with a heavy pack. But, if you’re up for the challenge you’ll be rewarded with stunning views, gorgeous campsites, and a huge sense of achievement.
Coastal Trail Quick Facts
Distance: 65 kilometres (40.4 miles)
Type of Hike: end-to-end
Elevation Gain: 1,137 meters (3,730 feet) total up and down
Hike Time: 5-6 days
Difficulty: Difficult
Location: Lake Superior Provincial Park
Trailheads: Gargantua Road (northern) & Agawa Bay Visitor Centre (southern) + various access points in-between
Reservations/Passes: Camping reservations (and vehicle permit) required
Trail Information: Lake Superior Coastal Trail
Where to Stay Nearby
📍High Falls Motel & Cabins – For a relaxing and comfortable stay before or after your hike, spend the night at one of the cabins at this Wawa property.
Map of The Backpacking Trips in Canada
What to Wear & Pack for Backpacking in Canada
When preparing to go backpacking in Canada, you need to have the right clothing and equipment. It’s important to be prepared for the terrain you will encounter, unpredictable weather, and emergencies.
As you will be carrying all your gear with you, you will also want your pack to be as light as possible. Ideally, your pack weight should be between 15-20% of your body weight. So it’s a good idea to invest in good quality and lightweight camping equipment.
To help you prepare properly for your hike, here is an overview of the key things you will need, plus a few items which can make your trip more comfortable.
Hiking Essentials
✅ Hiking Backpack
You will need a backpack designed for hiking so it’s as comfortable as possible, and can fit all your equipment. I would recommend a pack between 55 to 70 L.
✅ Hiking Boots
When backpacking in Canada it’s important to wear footwear which is comfortable, provides sufficient ankle support, has good grip, and is durable. As such, it’s worth investing in a good pair of hiking boots or shoes. Tip: Make sure to wear them in before your hike!
✅ Trekking Poles
A lot of backpackers prefer to hike with trekking poles. They are especially helpful if you’ll be encountering technical, steep, muddy or slippery terrain.
✅ Rain Gear
The weather can change quickly in the backcountry. So even if the forecast only predicts clear skies, you should still always be prepared with rain gear. At the very least you will need a rain jacket, but if rain is likely it can also be a good idea to take rain pants and a pack cover.
✅ Gaiters (optional)
Gaiters are very much an optional item. They help stop sand, rocks and mud getting in your shoes so are helpful to have on coastal hikes and during very wet weather.
Camping Equipment
✅ Lightweight Tent
Your tent will be the biggest piece of equipment you will be carrying, so it’s worth investing in a lightweight backpacking tent. In particular, I recommend the MSR Hubba Hubba 2-Person Tent. Although this is on the pricier side, it’s one of the lightest, most durable and comfortable tents on the market!
✅ Sleeping Pad
Having a good quality sleeping pad is essential for a good night’s sleep in the backcountry. Not only is it more comfortable, but it also helps to keep you warm. I currently use the Nemo Tensor Ultralight Insulated Sleeping Pad, but I also recommend the Therm-a-Rest NeoAir XLite NXT.
Sleeping pads come with different “R values” which indicate its capacity to resist heat. The higher the R value the warmer the sleeping pad. For summer camping in Canada an R value of 2.5 should be sufficient. However, in the spring or fall you will ideally want an R value closer to 4.
✅ Sleeping Bag
Just as important as having a good sleeping pad, is having a good sleeping bag. There are both down and synthetic sleeping bags on the market. Down is usually preferable for backpacking in Canada since it tends to be lighter and warmer. Although synthetic bags dry quicker if they get wet, so there are pros and cons to each!
However, what you really want to look out for is the temperature rating. For the summer, I recommend a temperature rating between 0°C to +5°C, and for the spring and fall you will be better off with a temperature rating closer to -10°C.
✅ Camping Pillow (optional)
Although this is an optional item, having a camping pillow really makes the world of difference when trying to get a comfortable sleep in the backcountry! My favourite is the REDCAMP Outdoor Camping Pillow. Although to save space, I would recommend an inflatable pillow.
✅ Tarp (optional)
A lightweight tarp does still add a bit of weight to your pack, so it’s very much an optional item. But if you encounter wet weather, you will be glad to have one! A tarp will provide a valuable shelter at camp for you to relax, cook and eat under. And during exceptionally heavy rain it can also be helpful to put up over your tent.
Hydration
✅ Water Filtration System
While backpacking in Canada you will have to collect water from natural sources such as rivers, streams and lakes. You should always treat your water before drinking it. The best way to do this is by using a water filter, however some people prefer using chemical water treatment tablets. My favourite water filter is the Katadyn BeFree water filter, as it’s lightweight, compact and quick to use.
✅ Water Bottle
Once you’ve filtered your water, you will also need a water bottle or hydration bladder to store it in. It’s also important that you always carry water with you while hiking, as sometimes it can be a long distance between water sources. I really like using Nalgene water bottles in either the 1 litre or 1.5 litre size.
Camp Kitchen
✅ Stove, Gas & Lighter
You will need a backpacking stove, gas canister and lighter to cook meals at camp (unless you plan on cold soaking your food!)
✅ Cookware & Dinnerware
You will also need a lightweight pot, mug, bowl and spoon or spork as part of your camp kitchen setup. To save space, another great option is collapsable cookware and dinnerware.
✅ Backpacking Food
Getting your food right is one of the most difficult things about preparing for a backpacking trip. You need your food to be compact and lightweight, as well as filling, energy dense and somewhat nutritious. The easiest option is to buy dehydrated backpacker meals. Although I also like to mix these up with things like instant oatmeal for breakfast, and ramen noodles or instant mashed potatoes for dinner.
For some extra protein you can also take tuna sachets and dried bacon bits, which you can add to your meals. Tip: make sure to pack some condiments like salt. There’s nothing worse than a bland meal in the backcountry!
For lunches and snacks, things like protein bars, chocolate, dried fruit, nuts, candy, beef jerky, hard cheese, bread and peanut butter are all great options. And you can also pack instant coffee or hot chocolate sachets, and tea bags, so you can warm up with a hot drink and get your caffeine fix!
✅ Storage Bags
When backpacking in Canada, you will need to hang your scented items or store them in bear caches overnight. It’s really important to keep the scent of your food (and other scented items) away from your tent and clothes so you don’t attract bears and other wildlife. The best way to do this is by packing all scented items together in a bag, like a dry bag. And it’s also a good idea to use Ziploc bags to keep things sealed and organized.

Clothing
✅ Hiking Clothes
When choosing hiking clothes, go with what you’re most comfortable in. However, it’s important to make sure your clothes are durable, comfortable and quick drying. Since you need to keep your pack weight down, you will be wearing mostly the same clothes everyday, to avoid carrying extra items. The only real exception to this is on longer hikes when you might encounter varying weather, so you may need a couple of different options or layers.
I usually prefer to hike in tights or bike shorts, but for backpacking trips I will often wear a pair of zip-off hiking pants, so I can convert them into shorts if I get too hot. Occasionally on long trips I will pack an extra pair of leggings or shorts to alternate between. For tops, I usually wear a regular sports bra with one quick dry tank top or t-shirt, and pack a long-sleeve top to alternate between, or layer on top.
Tip: Check out lululemon’s new hiking range! They have excellent hiking apparel for both men and women, which is durable, lightweight and comfortable. The Hiking Jogger is my current go-to hiking pants, and I also love wearing their running gear on the trail.
✅ Puffy Jacket or Fleece
Most of the time when backpacking in Canada it’s essential to bring a Lightweight puffy jacket or fleece (which packs down small). This is because although the days can get hot, the nights are much cooler. Plus, it can get very cold if you’re hiking at high altitude.
✅ Warm Hat, Buff & Gloves
Similarly to bringing a warm layer, having a warm hat or buff and gloves is essential if you’ll be hiking somewhere at high altitude, or which is likely to get cold at night.
✅ Camp Clothes
After hiking all day, you will want to change out of your dirty clothes when you get to camp and you will need something warm and dry to sleep in. Therefore, you should pack a set of clothes which you can wear at camp and sleep in. Most of the time lightweight thermal base layers are a great option as they’re warm and compact to pack.
✅ Underwear & Socks
In addition to your clothes, you will need to pack underwear and socks. You can re-wear these items by rinsing them or airing them out at camp overnight, although you will want to alternate them more often than your other clothes. How many pairs of underwear you bring is really up to you as it varies from person to person.
But for socks, I would recommend bringing 2 pairs of hiking socks to alternate between, and a clean pair to sleep in. In particular, I love the Darn Tough hiking socks, as they’re super comfortable and durable, and they come with a lifetime warranty!
✅ Camp / Water Shoes (optional)
Although optional, it can be a good idea to bring a spare pair of shoes to wear at camp. Especially if you will be hiking in wet weather. Additionally, if you will have any water crossings and are likely to get wet feet while hiking, you can wear your spare pair of shoes as water shoes.
✅ Swimwear & Microfibre Towel (optional)
If you’re doing a coastal hike or likely to pass by lakes on your trip, it can be really refreshing to take a dip. Therefore, it can be a good idea to pack swimwear and a compact microfibre towel.
Safety & Health
✅ Bear Spray & Holster
Canada has some amazing wildlife, including black bears and grizzly bears. If you will be hiking in bear country, you should always carry bear spray and know how to use it. The best way to carry it is on your belt or at the front of your pack in holster, so it’s within easy reach in an emergency. You can pick up a can of bear spray from most outdoor stores, such as the MEC or Canadian Tire.
✅ First Aid Kit
You should always hike with a first aid kit. At the very least it should include blister care, antiseptic, bandages, and basic medications. And make sure your kit is sealed in a waterproof bag.
✅ Toiletries & Hygiene
You will need to bring some basic toiletries, such as a toothbrush and toothpaste, moistureiser and lip balm, hairbrush and hair ties, eye care, feminine hygiene supplies, biodegradable soap or hand sanitizer, and toilet paper. Most backcountry campsites in Canada have outhouses or pit toilets, but there is no toilet paper, so bring your own!
✅ Sun Protection
When hiking all day the sun can take its toll, especially at high altitude. Therefore, it’s important to be sun safe and pack sunscreen, polarized sunglasses and/or a sun hat.
✅ Bug Spray (optional)
You may be surprised to learn that Canada actually has a lot of bugs! In particular June and July are the height of bug season. So if you’ll be hiking during these times don’t forget to bring bug spray.
✅ Paracord (optional)
It’s always handy to have rope with you when backpacking in Canada. In particular paracord is compact and strong. It can be used to hang your food if the food caches are full, repair equipment, and string up a tarp.

Electronics
✅ Headlamp
As a safety measure, and to find your way around camp after dark, it’s important to bring a headlamp on any backpacking trip. And make sure to check that the batteries are full before you head off!
✅ Satellite Communications Device
The Canadian backcountry can be very remote and accidents do unfortunately happen. Although this might not be required on very busy or shorter trails, as a safety precaution I would always recommend bringing a satellite communications device with you. In particular, I recommend the Garmin In Reach Mini for backpacking.
✅ Additional Electronics
There are a few additional electronic items which you may wish to bring backpacking in Canada:
- Phone: Although you likely won’t get any signal in the backcountry, you may occasionally pick up a bar or two. Plus, your phone can be used for timekeeping, tracking your hike on AllTrails, as a torch, and for taking photos.
- Watch: It’s important to have some sort of timekeeping device when backpacking. So if you’re not bringing a phone or satellite communications device, then bring a watch.
- Power bank: If you have devices which you want to charge during your trip, bring a power bank. Although your electronics should be able to last 1-2 nights on low power mode.
- Headphones: If you want to listen to music, audiobooks or podcasts, make sure to bring headphones.
- Camera: If you’re passionate about photography and your phone camera just won’t do, then don’t forget to pack your camera.
Backpacking & Hiking in Canada: FAQs
When planning a multi-day hike it’s important that you’re well prepared and hike according to your experience level. To ensure you do so, here are the answers to some frequently asked questions about hiking and backpacking in Canada.
How much does it cost to backpack in Canada?
Backpacking in Canada can be a relatively budget-friendly vacation. Although the cost will really depend on a few things, including the length of the trip.
To camp in the backcountry, you usually require a camping permit. For most of the National Parks, Parks Canada has a flat fee of $12.75 CAD per person per night, plus a small reservation fee.
Backcountry camping permits are also required for the various provincial parks and are priced similarly to the National Parks. Although the prices vary slightly from park to park.
To visit Canada’s national parks you also need to buy a National Parks Pass. There is a similar pass system in place for some of the provincial parks. So when planning your hike you should always check the relevant park’s website to find out about specific fees and passes.

In addition to paying for your passes and permits, you will need to ensure you have the right equipment for backpacking in Canada. This includes having suitable hiking clothes and gear, camping equipment, safety and first aid supplies and food. If you don’t already own all of these things, they can be expensive to buy.
Finally, when planning your trip, you will also need to factor in the cost of getting to and from the trailhead, as well as any accommodation expenses on either side of your hike.
How far should a beginner go backpacking?
Beginner backpackers should stick to short 1-2 night trips for their first few backpacking adventures. This will allow you to learn the required skills, test your gear and make mistakes without venturing too deep into the backcountry.
A short trip could even see you hiking only a few kilometres to the campsite, basing yourself there for a night or two while you explore the area, and then hiking out again. I would not recommend hiking further than 12 kilometres per day as a beginner backpacker.
When should you NOT go backpacking in Canada?
When you shouldn’t go backpacking depends on your level of experience, how prepared you are and safety and weather conditions.
You should not go backpacking in Canada if you are a beginner hiker and camper. Instead, spend some time building up your hiking experience on shorter trails, and learning how to camp in frontcountry campgrounds before heading into the backcountry.
If the weather forecast predicts harsh or dangerous conditions like thunder storms, heavy rain or snowfall, or wildfires, then you should postpone your backpacking trip. It’s a good idea to keep an eye on the Parks Canada or provincial websites for weather and fire alerts, as well as for trail closures. Sometimes due to flooding, fires and wildlife activity trails and campgrounds are closed for safety reasons, or because they have become inaccessible.

The time of year also plays a part. Backpacking in Canada is generally considered a 3-season activity and the best time to go is summer and fall. Spring can also be a good time for backpacking in some parts of the country. But there can still be a lot of snow in the mountains at this time, so certain areas will be inaccessible or dangerous, with higher avalanche risks.
Although backpacking is not a common activity in winter, there are some winter backpacking trails in Canada. However, you will move along the trails much slower than in the warmer months, and the equipment you will need to stay warm in winter is very bulky and heavy.
Therefore, if you do want to go backpacking in Canada in winter, it will likely only be a short trail. And you should only go winter backpacking if you’re experienced in winter camping, the weather forecast looks good, you know the terrain is safe and you take relevant safety precautions.
What is the longest backpacking trail in Canada?
The longest trail in Canada is the Great Trail (formerly known as the Trans Canada Trail), which is also the longest trail in the world. The trail is 24,000 kilometres (15,000 miles) long and covers the length of the country from the Atlantic across to the Pacific Ocean, and up to the Arctic.
However, this trail is a multi-use recreational trail, comprising hiking and cycling trails, as well as paddling routes and some ferry crossings. Therefore, it’s technically not a continuous backpacking route, rather a network of trails.
Is it safe to hike alone in Canada?
The authorities do not recommended solo hiking in Canada, especially on longer trails such as backpacking routes.
If you are an experienced solo hiker then it is generally safe to hike alone in Canada on shorter trails. But there are some risks you will need to be prepared for including unpredictable weather, getting lost, the risk of accidents and injuries, and animal encounters.
In particular, in bear country it’s important to be conscious of bears, as encounters are more likely when hiking alone. Additionally, some trails do not allow solo hikers due to frequent bear activity.
Does Canada allow wild camping?
Wild camping is allowed on Crown land in Canada and in certain wilderness areas. Although each province sets their own rules as to where and how long you can camp for.
However, this probably won’t help you when it comes to backpacking in Canada, as most trails pass through national and provincial parks, which only allow you to camp at designated campsites.
Final Thoughts on Backpacking in Canada
From multi-day mountain adventures to rugged coastal treks, there’s something for everyone when it comes to backpacking in Canada.
And, not only does Canada have some of the most diverse and epic terrain in the world, but it also has treks to suit all ability levels. So, even if you’re new to hiking, with the right preparation you can also experience Canada’s wild and beautiful backcountry.
I hope this list has helped you narrow down which multi-day hikes to do next, so you can start preparing for your Canadian backpacking adventure.